Prototype 1 - Cuberunner

Cuberunner is a game prototype I built while following along with Brackeys’ How to make a video game tutorial series on YouTube. The core gameplay loop is:
- Move left and right
- Stay on the track
- Avoid obstacles
- Get to the finish line
Play the game in your browser here.
View my GitHub repo here.
Planning
Here’s a high-level breakdown of the main features of this game:
Features
- Create straight track
- Create player
- Make player move
- Make camera follow player
- Create obstacles
- Make player die
- Create finish line
- Display Score
- Create level 1
- Create level 2
- Display menu screen
- Display credits screen
- Deploy to Unity Play
How It Works
The game architecture consists of:
- four scenes
- nine game objects
- nine scripts
Here’s a diagram of how the scripts (classes) communicate with each other and game objects:
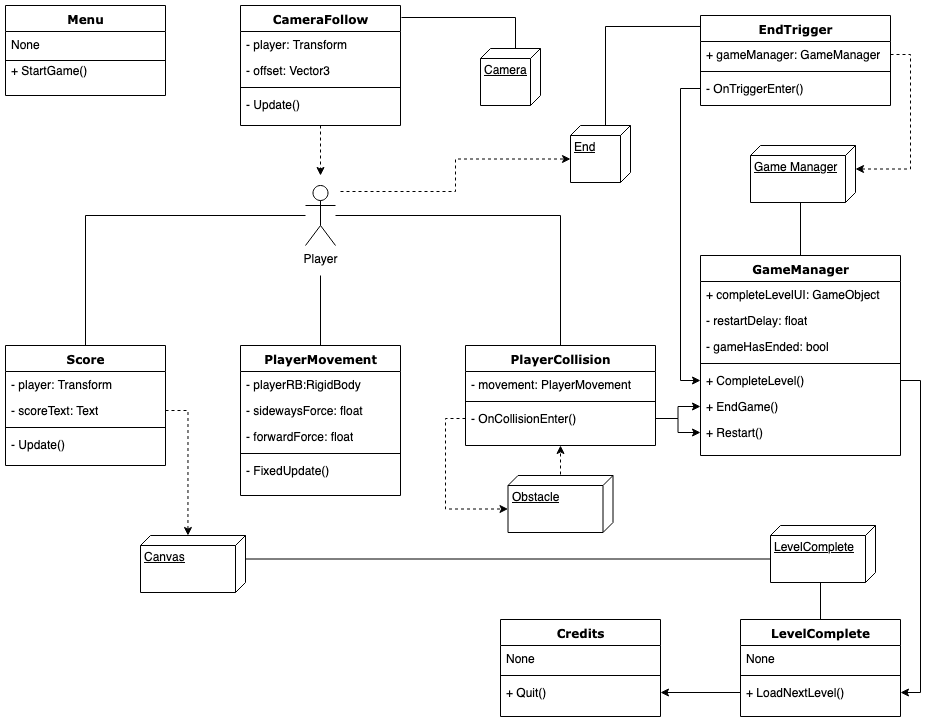
The above diagram doesn’t show everything. It’s only meant to illustrate the most important parts of how this game works. So let’s get into some more detail now. For any terms that might be unfamiliar to you, I have included a list of useful links at the very end of this article.
Scene: Menu
The game loads the Menu scene first, which contains a Canvas with welcome text and a Start button. The Canvas is a UI game object that is the parent object of other UI game objects within it (such as text and button game objects). The Canvas is set to scale with screen size, which means that it will adjust to the user’s screen size, regardless of device.
The Start button is hooked up to a script called Menu.cs, which contains a StartGame() method. This method determines the BuildIndex number of the current scene, then adds 1. Indexes always start at 0, so since the Menu scene is the first scene in the game, its BuildIndex is 0. Level 1’s BuildIndex is 1, so when the Start button is clicked, the button calls StartGame(), which loads Level 1.
Scene: Level 1
Level 1 contains nine game objects:
- Main Camera
- Directional Light
- Ground
- Obstacle
- Player
- End
- GameManager
- Canvas
- EventSystem
Technically, there are more than nine game objects, but that’s because the Obstacle game object represents only one obstacle. Since each level contains many obstacles, this game object is duplicated for each individual obstacle.
Game Object: Main Camera
By default, the main camera sits in a fixed position. Since the player is moving forward, we have to make the camera follow the player. This is why the Main Camera is hooked up to a script called CameraFollow.cs.
CameraFollow.cs only has one method, Update(). And Update() does only one thing here. It updates the camera’s position so that it’s always the same as the player’s position, plus an offset. In this case, the offset is -5 on the Z-axis, which means that the camera will always be 5 world units behind our player. Without the offset, the camera would instead be positioned exactly where the player is, so you wouldn’t see the player. But this could be cool if you were after a first person perspective instead.
Game Object: Directional Light
The Directional Light game object is a default object that is always loaded in a scene. It represents the sun and lights up our scene. In this case, the default settings are fine. But adjusting its Transform (particularly the Rotation) can result in some cool lighting affects that can affect the mood of the scene.
Game Object: Ground
The Ground game object is a primitive shape (initially a cube in this case) that has been resized. We’ve adjusted its width and its length. Its height doesn’t matter, since the player will only be moving on the surface.
We’ve added a Box Collider component, which is the exact same size as the Ground game object itself. This Box Collider ensures that any game objects sitting on top of the ground (such as the player or obstacles) actually stay on the ground. Without the Box Collider, these game objects would fall right through the ground.
We’ve also attached a Physic Material to the Box Collider. Physic materials allow us to change friction and bounciness of whatever game object the material is attached to. In this case, we have removed friction and bounciness, so that the surface is smoother for the player to travel on.
Game Object: Obstacle
Level 1 contains six obstacle game objects. These are just primitive cubes that have been resized. They each contain a Box Collider (set to the size of each individual obstacle), and a RigidBody. The Box Collider allows the player to collide with the obstacle, and the RigidBody allows the obstacle to be affected by the force of the impact with the player. The Obstacle game object also has a tag called “Obstacle”.
Game Object: Player
The Player game object is also a primitive cube. We’ve attached five components to it: a Box Collider, a RigidBody, and three scripts.
The Box Collider is the same size as the player. It ensures that the player can collide with other game objects, including the ground and any game objects on its surface. Without the Box Collider, the player would fall through the ground into a never-ending, dark void. Kind of like the year 2020…
The RigidBody applies physics to the player. This means things like giving the player Mass, Drag, Gravity, and applying forces. Since we’ll be applying force to the player to make the player move, we need a RigidBody.
The Player has three scripts attached. PlayerMovement.cs, PlayerCollision.cs, and Score.cs.
PlayerMovement.cs contains a FixedUpdate() method, which is recommended when we’re applying physics. In this case, this method is applying a non-stop forward force to our player. Through using two If statements, the script checks if we’re pressing the left or right cursor keys. If we are, the script applies sideways force to match the direction of the cursor key. A separate If statement checks whether the player has fallen off the edge of the ground (specifically if the player has fallen down to -1 on the Y-axis). If it has, then the script calls the EndGame() method in the GameManager, which invokes a Restart() method. The Restart() method checks the name of the current scene, then reloads it.
PlayerCollision.cs contains an OnCollisionEnter() method. Using an If statement, this method checks the tag of the game object the player collided with. Since we applied the tag “Obstacle” to all the obstacles in the game, this script checks to see if the game object our player collided with had the “Obstacle” tag. If it did, we disable the player’s movement, then call the GameManager’s EndGame() method.
Score.cs contains an Update() method, which means it’s constantly executing any code within Update() every frame. This method checks the player’s current position on the Z-axis, which will be a float. It then converts the float to a string, and passes the string to the text component of the scoreText game object, which is a child game object of the Canvas. This prints the score (our distance travelled) at the top of our game screen, and because it’s all happening in the Update() method, the score is dynamically updating every frame throughout our game session.
Game Object: End
End is an empty game object that you can’t see. It is positioned at the end of the level so that when our player passes through this invisible game object, it triggers a method in its attached EndTrigger.cs script. The method, called OnTriggerEnter(), calls the CompleteLevel() method in the GameManager, which enables the “Level Complete” text and loads the next level.
Game Object: Game Manager
Game Manager is another empty game object that you can’t see. Its only purpose is to be hooked up to the GameManager.cs script. Game Managers are often used to store game states, loading levels, player health/lives, etc. A Game Manager is basically the “brain” of a game.
GameManager.cs contains three methods: CompleteLevel(), EndGame(), and Restart().
CompleteLevel() calls the LevelComplete child game object in the below mentioned Canvas, and enables it. This causes the text, “Level Complete”, to appear on the screen.
EndGame() checks to see if the game has ended (eg. the player has fallen off the ground or collided with an obstacle) and invokes the Restart() method after a slight delay.
Restart() checks the name of the current scene, then reloads it.
Game Object: Canvas
The Canvas game object contains two child game objects: Score, and LevelComplete.
Score is a UI text box positioned and anchored to the top centre of the screen. By default, Score displays 0, the distance our player has travelled before the game begins. Once the game begins, the Score is dynamically updated every frame by getting the updated distance passed through from the previously mentioned Score.cs script attached to the Player.
The LevelComplete child game object is a white image that contains the “Level Complete” text. This game object is inactive by default, and is only activated once our player reaches the finish line. This game object also contains an Animator component, which gives us the gentle and smooth fade-in to a white screen before the “Level Complete” text fades in on top. The white colour of the LevelComplete image is animated through a few keyframes in its Animation timeline. The “Level Complete” text is separately animated the same way.
The Canvas is also hooked up to a script called LevelComplete.cs. LevelComplete.cs contains one method, LoadNextLevel(), which determines the BuildIndex number of the current scene, then adds 1. Level 1’s BuildIndex is 1, so when LoadNextLevel() is executed it loads BuildIndex 2, which is Level 2. If we are playing Level 2 and we finish it, LoadNextLevel() would load BuildIndex 3, which is the Credits scene.
Game Object: EventSystem
We won’t bother discussing the EventSystem. It’s a game object that is automatically added by Unity when you add a Canvas game object. The EventSystem, in our case, is what allows UI buttons to work on the Menu and Credits scenes.
Scene: Credits
The Credits scene is similar to the Menu scene. The only difference is that instead of a Start button, this scene has a Quit button. The Quit button is hooked up to a script called Credits.ca, which contains a method called Quit(). This method quits the application. However, this only works if the game is a standalone application on Windows or Mac. If you’re playing it in the browser, the Quit() method will only stop the game.
Summary
What I Like
The code is logical, easy to understand, and cleanly implemented. I like the way variables, methods, and classes are named here. The names clearly explain what their purpose is, and they generally focus on doing one specific thing.
What Could Be Improved
Player Movement
I find it interesting the way player movement was coded in this game:
    playerRb.AddForce(0, 0, forwardForce * Time.deltaTime);

    if (Input.GetKey(KeyCode.LeftArrow))
    {
        playerRb.AddForce(-sidewaysForce * Time.deltaTime, 0, 0, ForceMode.VelocityChange);
    }

    if (Input.GetKey(KeyCode.RightArrow))
    {
        playerRb.AddForce(sidewaysForce * Time.deltaTime, 0, 0, ForceMode.VelocityChange);
    }
We are using If statements combined with AddForce and ForceMode.VelocityChange to make the player move.
While it feels good to play, relying on Input.GetKey is a bit risky. It means we’re hardcoding the value of a specific key being pressed, which doesn’t allow the user to configure keys themselves. It would also be an issue if this game was ported to another device, such as mobile. A better option would be to use Input.GetAxis and Input.GetButton to avoid these issues.
Loading Scenes
The game handles loading scenes a bit differently between GameManager.cs and LevelComplete.cs.
In GameManager.cs, we have:
void Restart()
{
    SceneManager.LoadScene(SceneManager.GetActiveScene().name);
}
While in LevelComplete.cs, we have:
public void LoadNextLevel()
{
    SceneManager.LoadScene(SceneManager.GetActiveScene().buildIndex + 1);
}
Both do the job effectively, but are slightly different. One relies on a BuildIndex to load a scene, while the other relies on getting a build’s name. Neither is incorrect, but for consistency, I would probably prefer using GetActiveScene().buildIndex
Score.cs
While classes, methods, and variables are well-named throughout this codebase, perhaps the only exception is Score.cs.
Score.cs is actually not a score. It is dynamically displaying the distance the player has travelled. So a more appropriate name could be something like DistanceTravelled.cs
RigidBody on Obstacle
The Obstacle game object has a RigidBody attached. In hindsight, this feels unnecessary. With a RigidBody attached, it means that the obstacle will move slightly in response to the player’s impact. If that’s the effect we’re going for, then that works fine.
If, however, we want the obstacle to remain immovable, we could just remove the RigidBody from it without negatively affecting anything else.
What Next?
This prototype is a good base for a fun game. It has simple mechanics, and with good level design and interesting challenges, it could be an addictive game. I can visualize adding all sorts of other fun features, such as moving obstacles, power-ups, lives, etc.